Skin
Game Sections
- Unreal
- Unreal: RTNP
- Unreal II
- Unreal Tournament
- UT2003
- UT2004
- Unreal Tournament 3
- Unreal Championship
- Unreal Championship 2
Toolbox
Personal tools
ONS-ArcticStronghold
From Liandri Archives
Stationed at 24,000 feet and veiled behind blinding fog and constant snow, Arctic Stronghold provided the perfect place to conduct unsanctioned military experiments for use against the Skaarj. Restructured for Onslaught, this arena allows several paths to your enemy, and countless paths to death for the foolish or unwary.
Contents |
| Full title | Arctic Stronghold |
|---|---|
| Author(s) | Eric 'Swartz' Evans |
| Players | 10-18 |
| Music | SDG-ONS08 |
| Game | UT2004 |
| Gametype | Onslaught |
Map Description
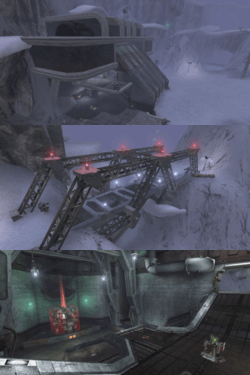
As the name gives away, this map is set in a small snowy valley with a dense blue fog. It's a bit of a compact Onslaught map with plenty of z-axis gameplay because of the many rocks and cliffs. The map is slightly asymmetrical, but the bases are built exactly the same. There's a bridge in the very center of the map, acting as the choke point of it. The Red Base is located at the Northeast corner of the map, while the Blue Base is located in the Southwest corner.
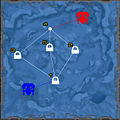
There are five nodes in this map:
- Node 1 is the Blue Prime Node, located in a road at the east of the Blue Base.
- Node 2 is the East Node, located in the middle of the map, at the south of the Red Base.
- Node 3 is the West Node, also located in the middle of the map, but at the north of the Blue Base.
- Node 4 is the Red Prime Node, located in a road at the west of the Red Base.
- Node 5 is the Center Node, located below the central bridge of the map.
Both the Blue Prime and Red Prime nodes are located in roads near their respective bases. These nodes house an Energy Turret, a Manta and a Scorpion each.
Continuing from the Red or Blue Prime node going upwards to the west, at the top of a risc, players will find the West node. From these same nodes, but circling the snow mountain at the center-east part of the map, players can find the East node. These nodes house each an Energy Turret, a Manta and a Hellbender.
Finally, going to the center from the Blue Prime and Red Prime nodes, players will find a bridge. Below it there's the Center Node, which holds the biggest cache of the map with four energy turrets, a Raptor, a Goliath and a Scorpion.
Link Setups
- Default: Both Cores connected to their respective Prime nodes. Both Prime nodes connected to the West, Center and East nodes.
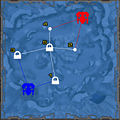
- Choke Point: Both Cores connected to their respective Prime nodes. The Blue Core is also connected to the West Node, while the Red Core is connected to the East Node. Both Primes and the West and East Nodes are connected to the Center Node. This setup avoids the dreaded "Enemy prime stalemate" situation, but makes the Center Node the bottleneck of the map.
Weapons & Pickups
Weapons
| Pickup | Location |
|---|---|
| Bio Rifle | One per base, with one ammo pack near it. |
| Mine Layer | One per base, with one ammo pack near it. There are ML also in the Lockers near each of the Prime nodes. |
| Grenade Launcher | On small mountains, near each team's base. Blue is located at the east of their base, Red is located east of their base. There's also one in the Locker near the Center Node. |
| Lightning Gun | One near each Base and one near the Central Node. |
| Redeemer | On a ledge near the central node. |
| Weapon Locker (LnkG,MinG,RktL,AVRL) |
2 at each team's base (4 total). |
| Weapon Locker (LnkG,FlkC,AVRL,MneL) |
One near each Prime node. |
| Weapon Locker (LnkG,ShkR,AVRL,LgtG) |
One near the East node, another near the West node. |
| Weapon Locker (LnkG,MinG,GrnL,AVRL,LgtG) |
One at the Center node. |
Pickups
| Pickup | Location |
|---|---|
| Health Pack | |
| Health Vial | |
| Keg o' Health | At the southwest entrance to the Center Node. |
| Shield Pack | One at each base, one near the Center Node and one between the Red Prime and West nodes. |
| Super Shield Pack | Southeast of the Blue Prime node. |
Vehicles
| Vehicle | Location |
|---|---|
| Manta | One at each powernode and two in each base |
| Scorpion | One at each powernode, except the nodes 2 and 3 |
| Hellbender | The Hellbender spawns at each base and the powernodes 2 and 3 |
| Goliath | The tank spawns in each base and the center node (5) |
| Raptor | The Raptor can be found in each base and the center node (5) |
| Paladin | With Bonus Vehicles, the Paladin replaces the Goliath at the bases |
| Cicada | With Bonus Vehicles, the Cicada replaces the Raptor at the center node |
| SPMA | With Bonus Vehicles, the SPMA replaces the Scorpion at the north(1) and south(4) nodes |
| Energy Turret | There are four turrets at each base and another 2 at the center node |
Tips & tricks
- The locations of both the Keg O' Health and the Super Shield gives the team starting at the Blue Base an advantage.
Offensive
The open layout of the field is excellent for sniper support when raiding nodes. Shock Rifles and Sniper Rifles can be great tools for distant takeouts, and even keep damage on the node to prevent reinforcements from spawning. Use the cliffs via Raptors, Manta jumps, or the Low-Grav/Quad Jump modifiers to your advantage in gaining a better nest.
Having trouble with a node? Due to the triple-path of the default layout, you can easily cut off one of the lateral or center nodes by attacking the node next to their base.
Defensive
Because of the openness and many paths to nodes, defense is incredibly difficult. Be sure to defend from the intersections that lead to a node, so that you are fighting the opponent before he can even attack the node itself. This is especial to the node next to the opponent's base, as the opponent has the advantage of close-spawning firepower.
Be sure to defend the bridge. Not only is the node important in the Choke Point layout, but it is also a major path going base to base for the vehicles. Be wary of drop raids from Mantas, and infantry when Low-Grav/Quad Jump make long falls an easy feat.
Link setup-specific tips =
- Choke Point: The Central Node becomes a key point in this setup, so the obvious tip is to defend it at all costs once you have powered it. If you started at the Red Base, though, focus on getting the Blue Prime controlled, as the Blue Base team has both goodies.


