Skin
Game Sections
- Unreal
- Unreal: RTNP
- Unreal II
- Unreal Tournament
- UT2003
- UT2004
- Unreal Tournament 3
- Unreal Championship
- Unreal Championship 2
Toolbox
Personal tools
CTF-Beatitude
From Liandri Archives
| Full title | Beatitude |
|---|---|
| Author(s) | Sidney 'Clawfist' Rauchberger |
| Players | 8-16 |
| Music | Nether |
| Game | Unreal Tournament |
| Gametype | Capture the Flag |
Map Description
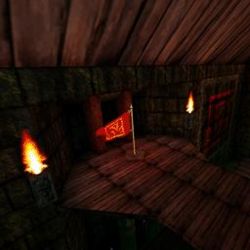
An ancient temple with plenty of water-pooled areas and wood bridges. It has five areas of interest: the Center, the Red tuberoom, the Blue tuberoom, the Red base and the Blue base. Be aware, though, if you depend on string locations in order to navigate, you might be for a nasty surprise. (See Trivia)
The central area has two ledges at the very top for mid-area snipers, a middle level with two lateral (north and south) platforms with weapons, and the lower level, minimally filled with water, with a hidden area holding an item. This area is connected with both tuberooms by way of an upper entrance and two lower entrances.
Each tuberoom is a big room connecting the central area with both bases. There's only one connection with the base, by way of the eponymous "|-" shaped tube. It also has several wood passages connecting the three entrances.
Finally, the bases themselves have several levels, exploiting the verticality of the level and giving attackers several routes to escape with the flag, in lieu of the tube bottleneck. The top level holds a platform with a powerup and a weapon. The next level has the flag itself, a chamber, and several weapons. The next-to-last level has a weapon and some health, and the bottomest floor has water and a pair of weapons.
Weapons & Pickups
Weapons
| Weapon | Count | Ammo | Weapon Location | Ammo Location |
|---|---|---|---|---|
| BioRifle | 2 | 4 | 1x Blue tuberoom, between lowest entrances to Central area. 1x Red tuberoom, between lowest entrances to Central area. | 2x Near the Blue base weapon. 2x Near the Red base weapon. |
| Shock Rifle | 3 | 6 | 1x Blue base, platform below the flag bridge. 1x Red base, platform below the flag bridge. 1x Central area, mid-level, north wing. | 2x Near the Blue base weapon. 2x Near the Red base weapon. 2x Near the Central area weapon. |
| Pulse Gun | 3 | 6 | 1x Blue base, totem near the tube entrance. 1x Red base, totem near the tube entrance. 1x Central area, mid-level, south wing. | 2x Near the Blue base weapon. 2x Near the Red base weapon. 2x Near the Central area weapon. |
| Ripper | 2 | 4 | 1x Blue base, at the northeast corner of the pool. 1x Red base, at the southwest corner of the pool. | 2x Near the Blue base weapon. 2x Near the red base weapon. |
| Minigun | 2 | 4 | 1x Blue base, chamber above entrance to the base. 1x Red base, chamber above entrance to the base. | 2x Near the Blue base weapon. 2x Near the Red base weapon. |
| Flak Cannon | 2 | 4 | 1x Blue base, at the southeast corner of the pool. 1x Red base, at the northwest corner of the pool. | 2x Near the Blue base weapon. 2x Near the red base weapon. |
| Rocket Launcher | 2 | 4 | 1x Blue base, behind the flag. 1x Red base, behind the flag. | 2x Near the Blue base weapon. 2x Near the Red base weapon. |
| Sniper Rifle | 4 | 14 | 2x Central area, at each ledge. 1x Blue base, highest point. 1x Red base, highest point. | 6x Central area, 3 at each ledge. 2x Blue base, near the Rifle. 2x Blue base, near the Amplifier. 2x Red base, near the Rifle. 2x Red base, near the Amplifier. |
Pickups
| Pickup | Count | Location |
|---|---|---|
| Health Vial | 44 | 5x Red base, north pillar. 5x Red base, south pillar. 5x Blue base, north pillar. 5x Blue base, south pillar. 6x Central area, 3 per Sniper ledge. 4x Central area, upper entrance to Blue tuberoom. 4x Central area, entrance to Red tuberoom. 5x Red base, northwest upper corner. 5x Blue base, southeast upper corner. |
| Health Pack | 16 | 2x Blue base, below the bridge to the Blue flag, near Shock Rifle. 2x Red base, below the bridge to the Red flag, near Shock Rifle. 2x Near the Armor, Red tuberoom. 2x Near the Armor, Blue tuberoom. 2x Red base, southwest upper corner. 2x Blue base, northeast upper corner. 2x Blue base, ramp to highest point, last turn. 2x Red base, ramp to highest point, last turn. |
| Big Keg O'Health | 2 | 2x Below each flag (1x Red base, 1x Blue base) |
| Body Armor | 4 | 1x Blue tuberoom, between lowest entrances to Central area. 1x Red tuberoom, between lowest entrances to Central area. 1x Blue flag base, north ramp. 1x Red flag base, south ramp. |
| UDamage | 2 | 2x at the top-most level in the flag room (1x Red base, 1x Blue base) |
| Shield Belt | 1 | Central area, at the lowest level. |
Tips & tricks
- The main problem with the map are those tubes connecting the tuberooms with their respective bases. As such, you might need a charged RL in order to take care of most of your opposition before reaching your base.
- Once getting into the base and passing the bottleneck, you have two basic options for attacking: the shortest one, by translocating to the chamber, and the longest one, by going through the wood walkways and the walled passage. In any case, you might want to have a teammate cleaning up the tube before escaping with the flag.
Trivia
- This map comes with the Bonus Pack 4, alongside the WarBoss and Xan Mark II models, and the maps CTF-EpicBoy, CTF-Face-SE, CTF-Ratchet, DM-Bishop, DM-Closer, DM-Grit-TOURNEY, DM-Viridian-TOURNEY, DOM-Bullet, DOM-CiDom, DOM-Lament][ and DOM-WolfsBay.
- The map has misnamed areas: the Blue tuberoom is called "Red tuberoom" and Blue base is called "Red base".
Content is available under Attribution-Share Alike 3.0.
Privacy policy • Bandwidth provided by AtomicGamer