Introduction
This tutorial is a work in progress. It is not finished, there are probably missing files and misc. references to things that are not yet uploaded. It is posted only as a placeholder for the final tutorial.
This is a beginners
guide for UnrealEd version 2.0 that was included in the Unreal Tournament 420 or
later patch. If you are using an earlier version or are editing for another game
that uses the old editor go to http://unreal/gamedesign.net/utc.shtml and get
the UnrealEd Beginners Guide.
As of this writing the current Unreal
Tournament patch is 436. Get it here: http://unreal.epicgames.com/
Though this tutorial is written with first time users in mind, even you veterans might learn something. Especially if you are not really comfortable with UED 2.0 yet.
To get the best performance out of the editor, limit what you have running in the background. Remove everything unnecessary including the screensaver to get maximum performance from Unreal and the editor. UnrealEd is a memory hog.
Tip: If you have been running a lot of games or other CPU resource sensitive applications, then reboot your system. This will help clear virtual memory and RAM and will allow maximum performance from UnrealEd. The more memory you have free, the less chance of a "random crash."
Table of Contents
The Interface
OK, you have Unreal Tournament, you have the latest patch you are ready to go. Go to your \UnrealTournament\System folder and double-click on UnrealEd.exe . You get a splash screen like this while the editor is loading:
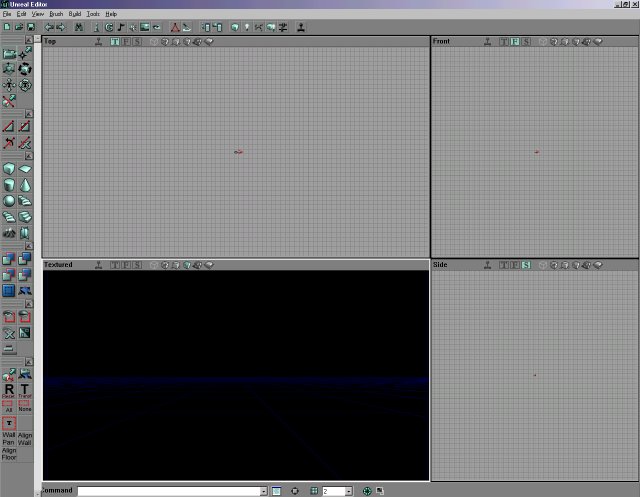
Once it loads you will see the actual editor. This is the UnrealEd 2.0 interface.
The first step is learning what and where everything is. Well take it step by step, piece by piece to get you familiar with the interface. One handy feature of the editor is the pop-up help windows when you put your mouse over a button. So if you arent sure where a button is, it will tell you what that button does. This is more convenient than a "tool bar reference." Also, most functions have several ways to access them in the editor. An Icon on a tool bar, a menu selection and a keyboard shortcut. For a list of the keyboard shortcuts go here: http://unreal.gamedesign.net/tutorials/basic/keyboard.html.
Menu Bar
At the top is a Menu Bar like most windows programs have.
![]()
Below is a list of each menu option and what you can do there. For a full list of Menu Options in details go click the image above:
File
Open, Save, Import/Export maps
Edit
Undo, search for actors, cut, copy and paste, Select objects.
View
Open the Browsers, access actor properties, choose, set and configure your viewports
Brush
Add, subtract, and access most brush functions. Import and export brushes.
Build
Set and perform level building options, play level
Tools
Access "add-on" tools like the 2D Shape Editor, light scaler, texture replacer
Help
Since there are no help files that come with UnrealEd 2.0 this is a dead menu.
Tool Bar (Top)
![]()
From the top tool bar you can access the most common functions from the menu bar by using these buttons. The bar is separated into easy to find groups.
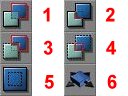
The first group is for file options:
![]()
1) Create New File
2) Open Existing File
3) Save File
The second group is for Undo and Redo
![]()
The next icon is the Search button. This allows you to search for specific actors by name, or other options.
![]()
The next set is for the Browsers
Adding things to your level, be it a texture or class or sound, is done by selecting the appropriate item from a Browser. You can open an individual browser by clicking the button on the tool bar or choosing it from the menu. Also, you can have all your Browsers "docked" in one master Browser, or you can have each one in a separate window. These are the Browser Icons on the top menu bar:
![]()
1) Class Browser --Where all the pickups, effects, etc you add to your level are found
2) Group Browser Where you can view, select, and modify groups of things you define (more later)
3) Music Where you can preview and add music to your level
4) Sound Where you can preview and add sounds
5) Texture Where you preview and add textures to your level.
6) Mesh View Where you can preview the actual meshes (models) for various things to add to your level.
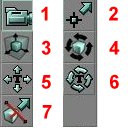
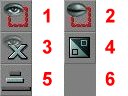
The next set is a couple tools:
![]()
The next set will bring up the property dialogs for actors and surfaces.
![]()
More on both of those later.
The next section is the options for rebuilding your level. Before you playtest a level you have to do a rebuild. The rebuild process sets up the geometry for rendering, updates the actors, renders the lighting and effects, and defines paths for the bots (more on that later).
![]()
The last Icon is for playing your level. Make sure you rebuild first!
![]()
Tool Bar (Side)
The side tool bar is where the icons for most of actual building functions. Use these buttons to select your modes, add/subtract brushes/etc

The side tool bar is split up into groups which you can hide or show by clicking the little arrow button. If the button is up it means to show it and down means to not show it:

Each group is outlined below:
Editing Modes
There are several editing modes that slightly change the function of some buttons, change your cursor, or change what you can do.
Brush Clipping
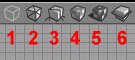
Builders
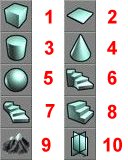
These are predefined, basic shapes (or primitives) for adding geometry to your level. Right-clicking any of them will give you a dialog box where you can plug in the numbers to resize it. While Im thinking about it, always build in powers of two, 8, 16, 32, 64, 128, 256, 512, etc You can use any even number, basically, but it helps line everything, especially textures since they are sized in powers of two. You can pretty much tell the shape of the primitive from the Icons.
1) Cube![]()
Cube Builder . This is a basic building block. Here is the cube builder dialog:
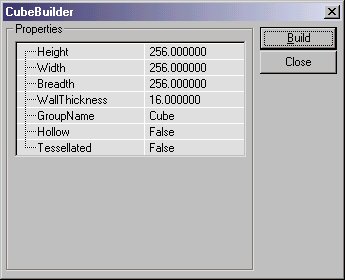
Height, Width and Breath are pretty self-explanatory. WallThickness applies only if you set Hollow to true. GroupName is where you can enter a group name to make this brush part of a group. Hollow will make the cube hollow (have an inside and out) with a wall thickness determined by the WallThickness setting above. Tessellated is where you can make the brush have extra vertices for shaping.

Standard Cube Tesselated cube
![]()
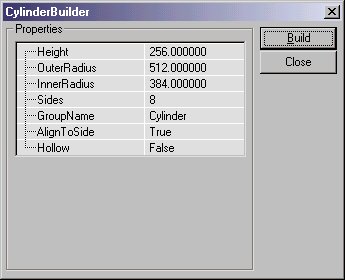
Cylinder Builder
Tool Bar (Bottom)
The last set of tools are along the bottom of the Edtior window.

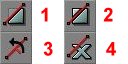
CSG
1. Add brush
2. Subtract brush
3. Intersect
4. Deintersect
5. Add Special
6. Add Mover
Misc
1. Show selected actors
2. Hide selected actors
3. Show all
4. Invert selection
5. Movement speed
ViewPorts
This is where you see what you are doing. Your veiws are customizable and flexible. The interface image above shows you the basic default configuration, fixed windows, and the default layout. This is what I will use for this tutorial. You can split the viewports into two types: 2D views (Top, Front, Side) and the 3D view.
Simply click in any view to make that viewport the active viewport. The active viewport will have a white highlight around it.
All viewports consist of a menu bar and a window where you can see your construction. This is the viewport bar:
![]()
The first part (where it says "Dynamic Light" in the image) is the title or mode the view port it in and will change depending on the mode you select. In the default layout the upper left window says TOP and the upper right says FRONT, etc
The rest of the bar is a series of icons that will highlight when seleted.
The first icon on the bar is a joystick and this represents real-time updating, which means you can see a change in this viewport as you make it even if this viewport is not the active viewport.
The next set of icons (T,F,S) represent the 2D views, Top, Front and Side. As you can see in the default view the icon corresponding to the title is highlighted. The Top Side and Front views are pretty self-explanatory.
The second set (the stylized cubes) represent the various 3D modes. The are outlined below:
1) Perspective: This will give you a wireframe representation (like the 2D views) of your level.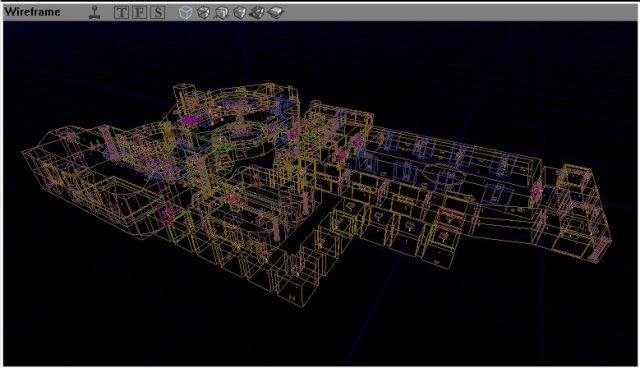
2) Texture Usage: This will give you a 3D view where each texture is represented in a different color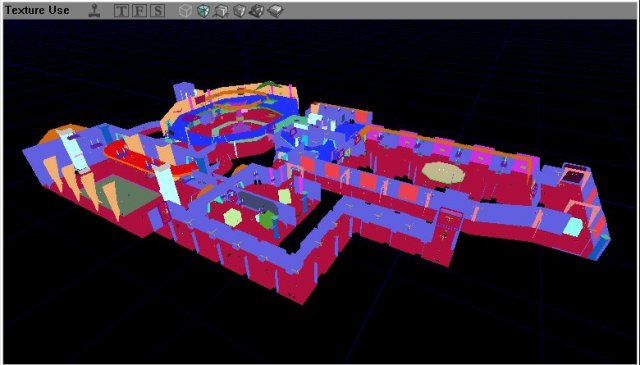
3) BSP Cuts: Shows you where BSP cuts are made (more on that later!)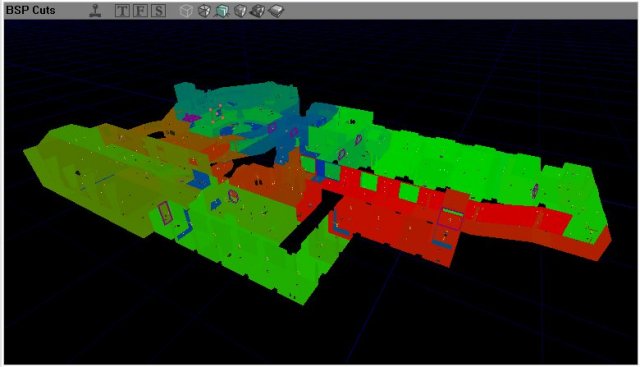
4) Textured: Shows you your level in a full bright view, showing all your textures, but not lights.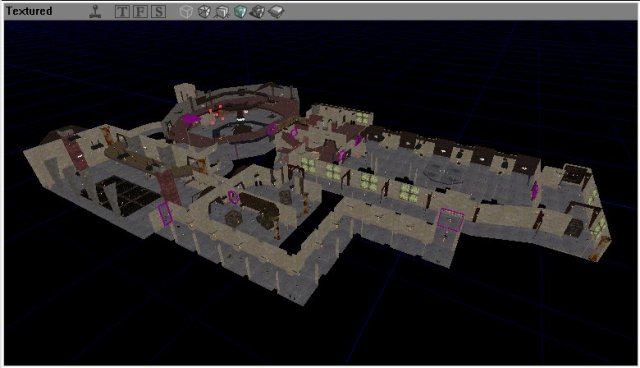
5) Dynamic Light: Shows you your level with full lighting.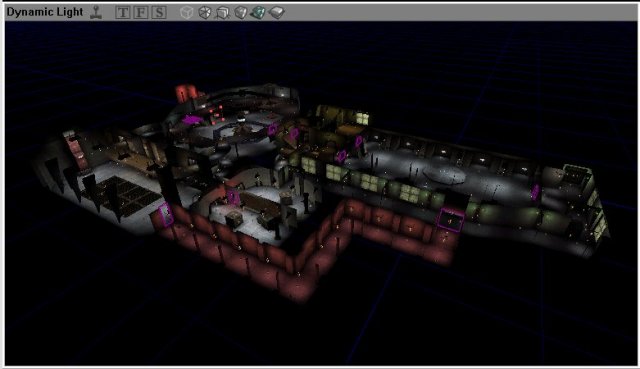
6) Zone/Portal: Shows you all your different zones represented in various colors.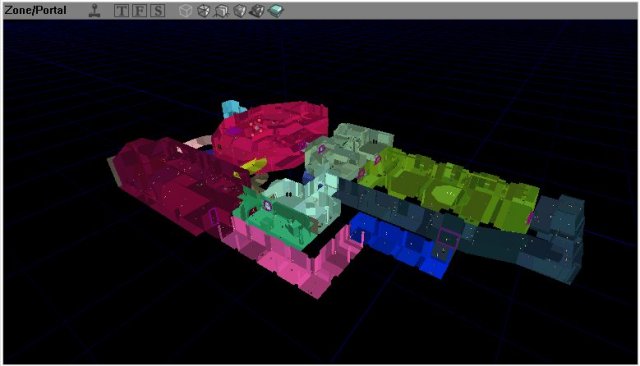
If you right-click on the title bar in any of the viewports you will get a pop-up menu where you can configure that view. A check mark next to a menu item means that option is currently selected. Here are the options:
Mode: Allows you to select the viewport mode, same as clicking the appropriate icon.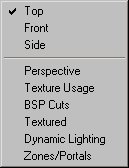
View: Allows to you to set certain items to be viewable in that port: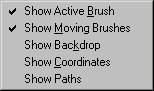
Show Active Brush: Shows the red or builder brush
Show Moving Brushes: shows your movable brushes like doors, lifts, etc
(more on movers later)
Show Backdrop: Presumably shows a background image, but I never go it to work
Show Coordinates: Presumably shows your coordiantes on the map, again I never got this to work.
Show Paths: Shows the path lines for bots after you have defined them (more on that later)
Actors: Lets you view the actors you have added to your level in different modes: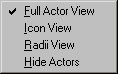
Full Actor View: Shows you the actual mesh for the actor you have added.
Icon View: Represents the actor as a more or less generic icon.
Radii View: Shows you the radius of a select actor such as a light, or trigger, etc
Hide Actors: Hides all actors from view.
Window: Renders the viewport in either 16bit or 32bit color.
The bottom of the pop-up menu allows you to render the viewport in either software mode or 3D accelerated mode.
If you right-click a blank space in any of the views (where there is no actor) you will get a pop-up menu like this:
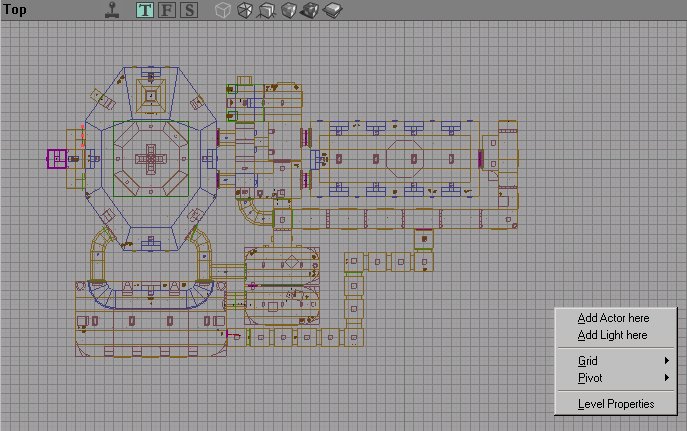
You can do various things from this menu. The options are:
Add Actor Here: Lets you add a selected actor at this spot (use in 3D view)
Add Light Here: Lets you add a light at this spot (use in 3D view)
Grid: allows you to change the grid size. Note, It's a good idea to ALWAYS use grid snapping, and try to keep your grid set at least at 16 units. You can go down to smaller sizes for adding detail and getting some brushes to line up, but never go below 2.
Pivot: Allows you to change/set the pivot point of a brush.
Level Properties: Allows you to set certain properties for your level, like a name, author, etc
.(more later).
Basic Construction
You build your level with the Unreal engine using brushes. Brushes are 3D geometric objects that make up the physical aspect of your world. All the physical aspects of your world (walls, floors, ceilings, etc ) are called the geometry and are all made from these brushes. There are several types of brushes, solids, non-solids, etc but more on that later. This construction is done by means of a builder brush (or red brush) that you shape, size, and position and then subtract from or add to the world.
When you start you have blank screens. This is often referred to as the "void." A null world where nothing exists until you put it there. To get things in the world you have to consider that it is not a void like space is a void, a nothingness, but more like a solid block of clay from which you sculpt your world. To make a playable area you have to carve away at the clay, or make a subtracted area in which your world exists. You can then add brushes to make things within that area (I use generic terms like "area" because the exact same building techniques are used whether you are making indoor or outdoor areas). So lets get started building something! If you havent already go read the interface so you can follow along when I say things like "bring up the cube properties."
By adding the geometrical shapes (brushes) and texturing them you create the environment where the actioi takes place, your level, your world. Then you add lights, player starting spots, weapons, pickups, etc to make an actual playable level.
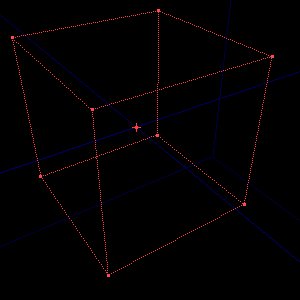
The various kinds of brushes are color coded, and that color will change when that brush is highlighted. Here are the brush types by color:
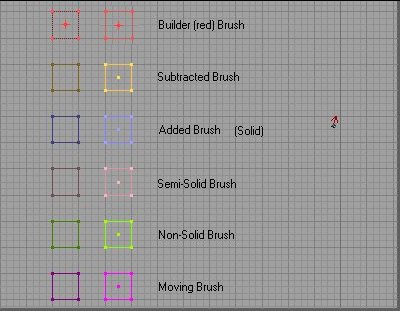
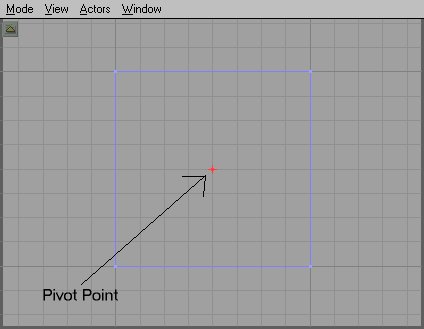
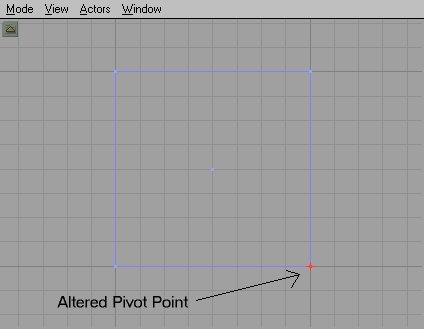
If you notice in the image above each brush has a "dot" in the middle, and dots on each corner. These dots are called vertices (plural, vertex for a single one). Vertices are points where the planes that make up a brush come together. The center vertex is a special vertex called the pivot point. This is the pivot point where the brush will rotate around, and also is used for "snapping" the brush to the grid. You can change the pivot point of a brush with the pop-up menu, or by clicking a vertex. You will see a little red cross or plus sign on the selected vertex. You can re-snap the brush to the grid by right-clicking on a vertex.
Movement
Movement in the windows pretty easy, but a little different in the two modes.
2D Movement To move in the 2D view simply left-click and move the mouse up, down, left or right. If you hold both mouse buttons you can zoom in and out by moving the mouse.
3D Movement In the 3D view holding the left mouse will move your view in and out or pan it left and right. Right mouse will pan your view up and down and left and right. Hold both mouse buttons will move your view up and down.
To move an object in UnrealED left click it any view. This will highlight it as the selected actor. Whenever you select an actor you can right-click to get a pop-up menu. You can access the actors Properties from here (more on that later). To move it down in the 2D views (except, of course the top view) left-click it to highlight it and then hold Shift and the Left Mouse Button. Move the mouse up and down and the actor moves with it. You can use this method in any of the views to move objects. Try moving the light around a little in each view to see how it works. In the 3D view the object moves with your view. So you have to highlight the actor and then move your view and the object moves with it. Now highlight the light, and move it down to the center of the cube.
Tips: If you hold CTRL instead of Shift the object will more the same way, except your view will not move with it.
Always left-click an
object to select it. If you have an object selected and then right click another
object it will select them both (a potentially hazardous situation if you are
moving, deleting or changing an objects properties.
Imagine that the "void" in the 3D view is a large piece of clay. You will make rooms/areas by carving out of this clay the basic shape, and then adding details inside the space created. You will start by subtracting a cube from the world and then adding stuff inside it to make your room. Your primary tool is the active, or red building brush. I will call this "the red brush" or the "building brush." I might also revert to saying things like "reset your brush" and unless otherwise noted this will ALWAYS means your red brush.
Adding, Subtracting and Texturing Brushes
Okay, lets make something! Your first room couldn't be easier. First let's see that Red Brush I mentioned. Simply left-click the Cube Tool. You should now see a red cube appear in all 4 views. As explained above, you can turn on the real-time updating now so you can see your movements in all windows. Remember, you can press the joystick icon by the green arrow, or click in a window and press the "P" key to do this.
Note: Any brush visible in the 3D view (except the red brush) will not show movement or even deletion until you rebuild.
Okay, we set the real-time updating in all windows and we still have this red cube. Wow, you say. In the Browser, select the Texture mode. Now we need to load a texture set. At the bottom press the Load button. A windows interface now opens and lists various files with UTX extensions. these are your texture packages. Each one is a set of textures. For now just load Ancient.utx. you can browse through the others later.
A bunch of new textures should now appear in the browser window. These are the textures in the file we just loaded. If you notice under the browser mode there are two pull-down menus. Both currently say all. The first one is to chose a loaded texture set. If you press the down arrow on the right you will see a list of loaded textures. Most are default engine sets, except Ancient, which we just loaded. Make sure Ancient is selected now.
Having selected a texture, now press the Subtract button and you should now have a cube with the texture you selected. To change any texture left-click it in the 3D window. This will highlight it. Now if you select another texture it will replace the current one. Try changing the floor texture. Okay, we have a basic cube but it's not a level yet. First, we need to add light to it. But before we do that let's Rebuild.
Rebuilding Geometry
Press F8 to open the Rebuild window. This window looks complicated but you don't need to concern yourself with most of it. Rebuilding sets everything up and renders the dynamic lighting for your level. You have to Rebuild to see the results of dynamic lighting on the textures and to see the results after deleting a brush. When you first add rooms they are rendered unlit (full bright) and lighting won't affect them until you rebuild. For more info on the Rebuilder click the image.
You can see how many objects are selected by right-clicking a selected object to open the pop-up menu and checking the first line. It tells you what kind of actor is selected and how many. See the image below. If multiple actors of different types are selected it will look like the second image.
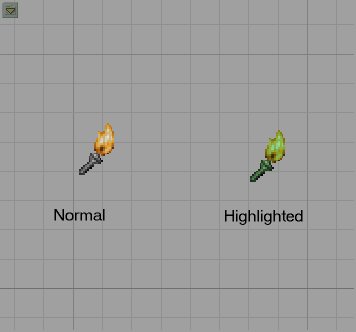
This is the light actor when it's not highlighted and when it is highlighted. Note the greenish tint when it is highlighted? That is your indicator that it is highlighted. Most every actor will have this greenish tint when it is highlighted.
Adding Actors
We now need to place a starting point for our player in the level(so we can actually play it, or just to check it out in the game). In the Browser menu, select Classes. Look down the menu for Navigation Point. Press the minus sign next to it to expand the classes. You should see several classes, but the one we want is PlayerStart. Click it to highlight it and check at the bottom of the browser. On top the buttons down there, is where the editor tells you what is selected. Make Sure it says "Engine.PlayerStart (scripted)."
Now, right-click in the center of the floor of our cube and select Add PlayerStart Here. You should now have a Joystick looking icon there. This is your player starting point. This is the main method of adding actors to UnrealEd.
Note: Often when selecting classes from the Browser, you will accidentally double-click the class. This will pop open the UnrealScript window, showing the script for that class. Simply click the X on the Script Window to close it.
Rebuild your world. Now we need to save this level. Call it something original like TEST1 or something. Either choose Save Level from the Menu Bar or press CTRL-L. Name and save the level. Now press CTRL-P or choose Play Level from the Menu Bar. The log window will start scrolling and when it's done Unreal will open in your level. Now you should be in a small, ugly little room with a mysterious light source. That's what we just built! Bet we can do better.
There's nothing to do here so quit the game and return to the editor. As you know from the little play-test we did, this was no fun. So let's add some more to this level. First off, it would be nice if the light were actually coming from somewhere. Let's make a Torch! There is a handy little torch flame included with the game. You should still have classes in the browser. Click the plus sign by navigation point to close it, and then expand Light. Find TorchFlame and highlight it, but don't add it yet. First we need something for the torch to sit on. Right-click the red brush to highlight it. From the properties menu select RESET and Reset All Positioning. This is in case we rotated it or anything. The brush should move back to center (if you moved it). Now we need to change its size to something smaller than the room! Right-click the Cube Icon on the Tool Bar and open Cube Properties: