TexAlign Utility Tutorial
For: TexAlign V1.01-R1
By: R. YoMammy Wey
Everyone who starts mapping with UnrealEd inevitably runs into the texture alignment problem on curved surfaces. Confronted with the problem, we usually turn to an editing forum only to be told the bad news: "You have to do it manually using the multi-pan technique". Once you figure it out, its saves a bit of time but the process can still be painfully slow. (If you dont know the "multi-pan" trick yet, dont worry you will by the end of this tutorial).
The TexAlign utility, although no cure-all simplifies some of the tedium of the "multi-pan" technique and, under some circumstances, can cut the process time in half or more. Although suited for any vertically curved surface ( sidewall of curved steps, walls of a curved tunnel, etc.), I will be using pillars in this tutorial. Once "pillar wrapping" is understood, the others will become obvious.
Pillar Wrapping (God help my mouse)
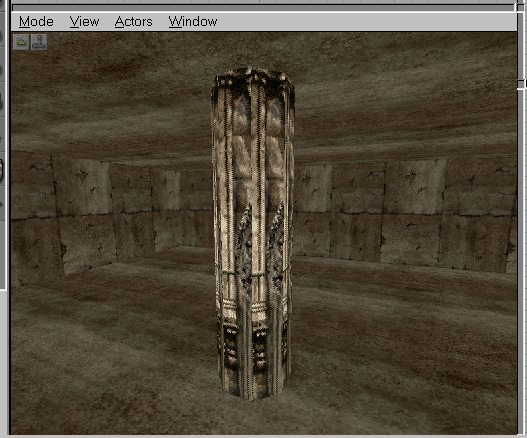
First, lets start by creating an 8-sided pillar (aligned to side) with a radius of 32 as shown in the next picture.
I textured my pillar with one of the angels from the ShaneChurch package. I chose this particular texture because its non-repetitive in nature and, thus, any misalignment will stand out like a turd in the punchbowl. Also, before this shot was captured, I selected all the textures of the pillar and applied an Align: Wall Direction Wall Pan the results of which yields the same texture offset on each facet of the pillar yuck.
Using the "multi-pan" trick, youd have to manually pan all but one of the facets until you get your first alignment with the unselected facet as the following picture shows. Also, youd have to remember the exact number of pan units it took.
In this case, I manually figured out it took 27 units to get alignment of the first two, as shown. Also note (not shown so well ) that all other facets, except the one on the left, are selected. Thus, they all panned along with the one of interest. To proceed, we simply deselect the one we just aligned, pan another 27 units, deselect the next one down continuing the process until weve gone all the way around the pillar.
Now, theres two problems here: A) Each time we pan 27 units, we have to pan 4 units six times, then 1 unit three times for a total of 63 operations. And B) when we get all the way around, we run into the following problem:
Oops!!! The last facet doesnt line up with the first. Dammit after all that work too! The reason for this, of course, is the total circumference of the pillar ( 212 units in this case) is somewhat less than the total width of the texture being used ( 256 for the texture used in this example).
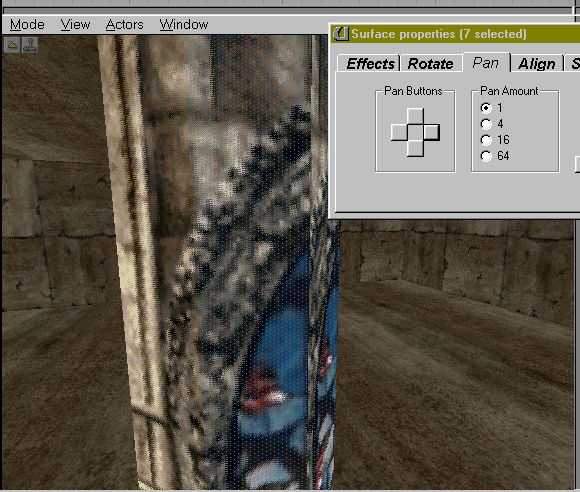
Now, lets invoke the assistance of TexAlign and see how things can get a bit easier. We will start the pillar the same way as it was in the first picture: Aligned Wall direction and Wall pan. But, this time we will leave ALL facets selected then run TexAlign, which looks like this: (So I dont have to repeat this picture, Ive placed colored dot markers on the image for easy reference. Also note image quality may show misleading values)
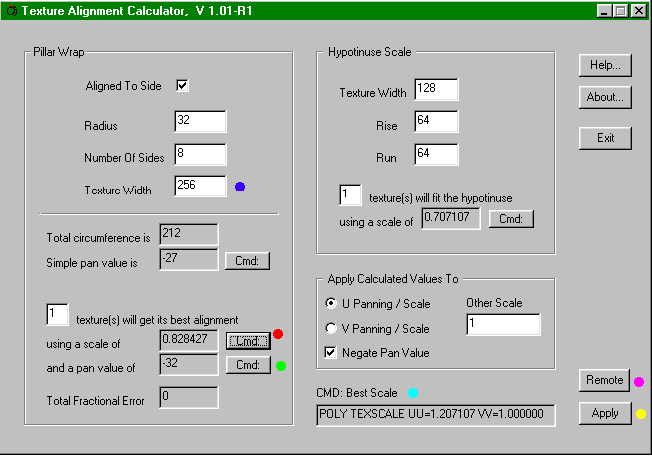
Most of the default values worked for this example except the texture width (blue dot), which I changed from the default 128 to 256 since the texture were using is 256 units wide. After changing this value (or any other for that matter), if you then click any other control, the calculations will be performed. Next, I clicked the CMD button next to the "best alignment" scale box (red dot). Doing this generates the necessary UnrealEd command and places it in a readout on the lower right for your viewing pleasure (cyan dot).
At this point, all of the facets of the pillar are still selected and weve preped TexAlign to send a scaling command. Notice in the area just above the command readout (cyan dot), the U Panning / Scale is selected which is what we want because the new "best alignment" scale is to be applied horizontally, in the U plane.
Now, to apply the new scale to the pillar facets (hopefully still selected in UnrealEd), simply hit the Apply button (yellow dot). If the 3D view in UnrealEd is visible when you do this, you should see the change. Now that we have the scale of the pillar textures set to give us a good fit, the only thing left to do is to pan them around as we did in the first demonstration. But this time, were going to make the panning process a bit easier!!!
Before you go back to UnrealEd, hit the CMD button for the "best alignment" pan value (green dot), which again assembles an UnrealEd command. This time, however, instead hitting Apply, hit the Remote button (magenta dot). This will minimize the main TexAlign window and will launch a small "always on top" remote control box which you can use in UnrealEd. You should now see something that looks like this:
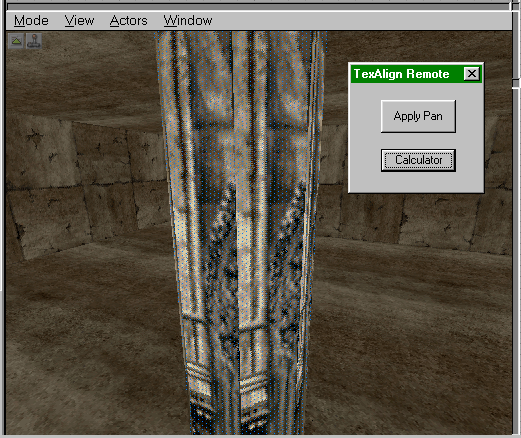
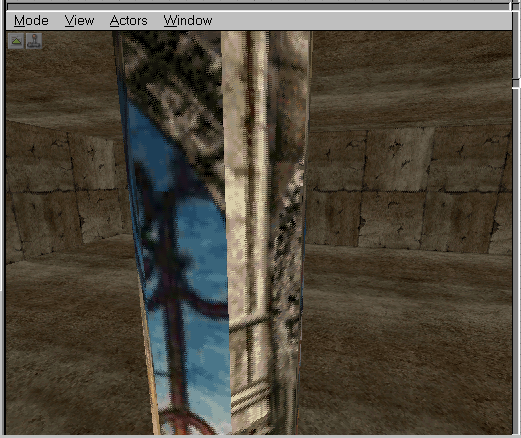
At this point, the remote controls Apply button will apply the last command assembled in the main TexAlign window which in our case was the "best alignment" pan value. So, to proceed, simply deselect one of the pillar facets, then hit the remotes Apply button. Deselect the next one down (youll know which one), and repeat the process until the pillar is done. This time, however, youll notice the last facet lines up with the first perfectly. Furthermore, the panning process only took 7 clicks of the remotes Apply button vs. 63 clicks of the pan buttons if done using UnrealEd. Hell, if nothing else, TexAlign will save your left mouse button !!!
NOTE: you dont have to let up on the control key (used to deselect a surface) when you press the Apply button as Ctrl does nothing special to the remote.
Simple Panning
In some cases, like when you pan / align the side of a set of curved steps, having a perfect fit on the scale isnt really necessary since it wont be "wrapping back in on itself" as with a pillar. In these cases, you can hit the CMD button by the "simple pan" and apply to the desired facets using the remote in the same way as described above.
Other Scale
By design of UnrealEd, any time you apply a scale to the U plane (in our examples), the command must also apply a scale to the V plane and vice-versa. When you apply the calculated scale to the U plane of your pillar, you may have some other preference for the vertical scaling. This is the purpose for the "Other Scale" box. It lets you manually key in the "non-calculated" scale to be applied to the other plane. If you want a 1 to 1 ratio with respect to U and V, you can highlight the "best scale" value, hit Ctrl+C to copy it, then paste the value to the "Other scale" box via Ctrl+V standard Windows copy & paste feature.
U Panning / Scale & V Panning / Scale
These buttons select which axis to apply the panning or scaling to. Calculate any value then press them and watch the resulting change in the command readout. In most cases, pillar wrapping applies the calculated value to the U scale. But, however, there may be times when you want to wrap the pillar with a texture that has been rotated 90 degrees. In this case, you have to select the V Panning / Scale. But, watch out things get confusing when doing this. Which will be discussed in the Caveats section below.
Total Fractional Error
Although scaling in UnrealEd accepts floating point numbers, the panning process does not. Thus, there will be certain combinations of pillar sides & radius which result in fractional errors. Positive values of TFE (Total Fractional Error) means the final wrap will overrun negative values mean it will underrun. To see this, key in a pillar (aligned to side) of radius 96, 12 sides, and a texture width of 128. The TFE will be 19.2923 pan units. As you can see, however, were trying to stretch 128 texture units across a circumference of 617. The resulting scale calculation is 4.82309. Hmmmm. Just for grins, lets change the number of textures we want to wrap to 4 then press any other control to recalculate. Now the TFE is 4.82309 which means by the time we wrap, we will overrun by 4.82309 texels and, the joint will look misaligned. In this case, however, what you can do is: Every 3 pan steps, manually pan it back one unit using UnrealEds panning tool. What youre effectively doing is spreading out the error across the entire circumference of the pillar rather than at the last joint.
Pillar Wrapping Caveats
As stated, TexAlign isnt a cure-all for the texture alignment problems. It runs into difficulties if the curved surface wraps around anything other than the Z axis (a pillar laying on its side, for example). The reason for this is UnrealEds Align Wall Direction / Wall Panning attempts to stretch textures for the best wall direction fit and the results is alignment discontinuity from facet to facet of the sideways pillar. A workaround for this is to create and texture the brush in question while it is standing up, then "Copy Polygons To Brush", rotate the builder brush into place, and the fat lady sings.
Other problems arise with pillar wrapping when the textures are rotated or have their U or V flipped. In these cases, it is still possible to get TexAlign to help, but the standard counter-clockwise procedure and one-pan-per-facet often fails. The best way to learn how manipulate these cases is to set up a test map and practice it since detailed explanation confuses even me. Its more of an intuitive thing youll get if you just play with it for a while.
Hypotenuse Calculator
Weve all had times when we want to cove the corners of hallways or rooms with an angle. Makes them look so much less boring than square cuttouts. After its in place and you apply the texture you want to it, UnrealEds Align Wall Direct / Wall Pan will attempt to stretch it to fit. The problem is, however, if you want to change the horizontal scale (to match the vertical scale, for example) you have no idea what to set it to.
To assist in this headache and eliminate random guessing of scaling figures, use the hypotenuse calculator. Determine the triangle involved in your beveled corner and key in the rise and run (and proper texture width, of course ). The rise would be the height of the triangle while the run would be its horizontal component. Then, simply hit the CMD button and apply it to the selected texture using the Apply button. You can also launch the remote for this as well if there are numerous beveled surfaces you need to rescale.