To my knowledge, all of these programs are freeware. I personally recommend using The ModPlug Tracker (MPT), which is a Windows based tracking program and easy to use. I will use MPT for this tutorial and I recommend you using it. But ultimately, it's up to you what program you want to use. :)
Additionally, you probably also need a sound editor, like Goldwave to edit your sound file to your needs. However, Goldwave is not freeware. Following is a list of some sound editors which ARE freeware (in no particular order):
- SoundPad
- WinAmp - Can save MP3s in WAV format.
- DecodePro 1.0 - An MP3 to WAV converter. This link will take you to Tucows.com.
I haven't tried these sound utilities, so I can't give you any information on what they can or can't do.
Remember: to import your sound file into MPT, the file must be in wave format!!! For example, you cannot import any mp3 files into MPT - you first need to convert them to .wav files...
NOTE: If you want to make a module for Unreal Tournament (umx), there are some things you need to know before you go on! The Unreal Tournament engine does NOT support any high-quality wave files. To make a music module (umx) for a UT map, your wave file format must be no more than:
- 22050 Hz - you can't use wave frequencies higher than 22050 Hz
- 16-bit - no idea what the 16 bit means (bitrate perhaps?), but don't use wavs in 32-bit or something...
- Mono - you can't use stereo wavs. No, you can't use surround either ;)
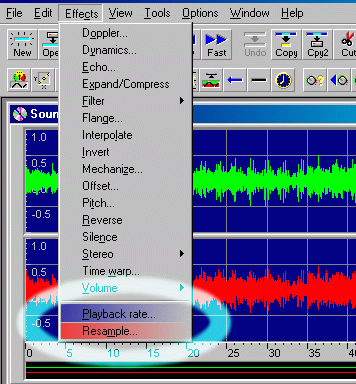
You can use a sound editor to convert the wave file. To change the sound frequency, you need to find a command with which you can resample the sound. In Goldwave, you can do this, by going to the menu Effects > Resample... and you can choose a sample rate for the sound.
Be advised that you also need to make sure that the playback rate is at the same value as your sample rate, or the wav will sound funny if you play it. So make sure the Playback rate is set at 22050 Hz (if you chose this as the sample rate).
In Goldwave this is done automatically. You can change this through the same menu, option Playback rate...
Don't forget to change the sound to 16-bit and mono. In Goldwave, you can do this by saving the wave file. In the save dialog, a drop-down list appears with the option to save the wav in 16-bit, mono. I don't know how to do this with other sound editors. You should browse a bit until you find the options...
Also keep an eye on your file size. Having a wave file in 22050 Hz/16-bit/mono is fine, but if the file size is over 5 MB, then you seriously need to tone down the file size. You might consider making it 16000 Hz/8-bit/mono or something like that.
Try to find a balance between file size and quality. A 2.5 MB wave file should roughly be the maximum you want to have.
Making the module
Once you have your audio file, you need to import it into MPT.
So, start up MPT. When the splash screen disappears, you can begin. To import the wave file, click on "open" and go to the directory which contains the wave file. If I'm correct, the wave file doesn't appear! What now?
No, don't go away yet!!!!!! :D
You need to select the appropriate file type from the drop-down menu. The default should be "All modules". You need to select Wave files (*.wav). See below
Phew! :)
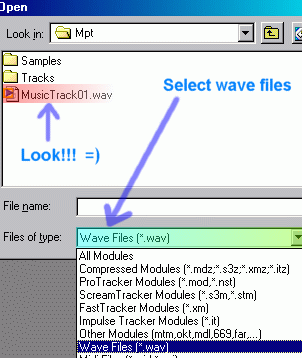 Now you can select the wave file. Select it and choose open. You see a new screen appear with some tabs. The general tab doesn't contain anything special.
You can e.g. specify the song title or add channels. The patterns tab contains, uh well, the patterns! The number of patterns depends on the length of the song. Trackers record different notes through patterns and thus create a whole song.
The samples tab contains the wave sample that you imported. Very useful for trackers, because here they can import the samples (of musical instruments) they want for their track to contain.
To you, it doesn't mean anything if you're just here to convert the wave file ;) Same thing goes for the instruments tab. In the comments tab, you can put comments about your song. Some info about yourself, credits, notes/reminders, anything.
Now you can select the wave file. Select it and choose open. You see a new screen appear with some tabs. The general tab doesn't contain anything special.
You can e.g. specify the song title or add channels. The patterns tab contains, uh well, the patterns! The number of patterns depends on the length of the song. Trackers record different notes through patterns and thus create a whole song.
The samples tab contains the wave sample that you imported. Very useful for trackers, because here they can import the samples (of musical instruments) they want for their track to contain.
To you, it doesn't mean anything if you're just here to convert the wave file ;) Same thing goes for the instruments tab. In the comments tab, you can put comments about your song. Some info about yourself, credits, notes/reminders, anything.
Now, luckily for you, MPT automatically converts the whole deal into a music module, so there is little you need to do right now =)
Click the play button on the main toolbar or press F6 to play the module to see if it turned out right.
Saving
If this is your last stop and you're here only to convert a wave file to a mod, then you just have to save the mod in MPT. But if you also want to convert the mod to a umx file for use in a UT level, READ ON!
- Module file types: it doesn't really matter much which format you choose to save the mod in (IT, S3M, XM or MOD). The different formats are there for people who want to add some effects to their modules. Different formats have different effects - effects like vibrato, tremolo, panning and note delay. It's not useful if you want to convert a music file into a music module.
UMX requirements
Before you save the mod and close MPT, there's something you need to do if you ultimately want to convert the mod into a umx:
I've heard from some people on the Unreal / UT Editing Forum that when they made the music module and converted it to a umx, the music stopped playing after approximately 30 seconds when they were listening. Not very desirable!
I've done a little research of my own and have found the cause of this problem. Who cares!?!? Yes, but I also found a solution! =)
I've noticed that if you'd set the speed for each pattern in the patterns tab, the module would play correctly when converted to a umx...confused already? Don't worry, we'll go through this step by step ;)
The problem - as I assume - is that the Unreal engine does not recognise and process empty patterns in a music module. Maybe the engine doesn't see anything to play and just loops back to the beginning of the song...who knows? Anyway, the engine has got problems when there's nothing in a pattern. To solve this problem, do the following:
Switch to the "patterns" tab. Above the table-like area, you see a slide bar which contains all the patterns with their pattern numbers. The amount of patterns depends on the length of the song. But you should see something similar as the screenshot below.
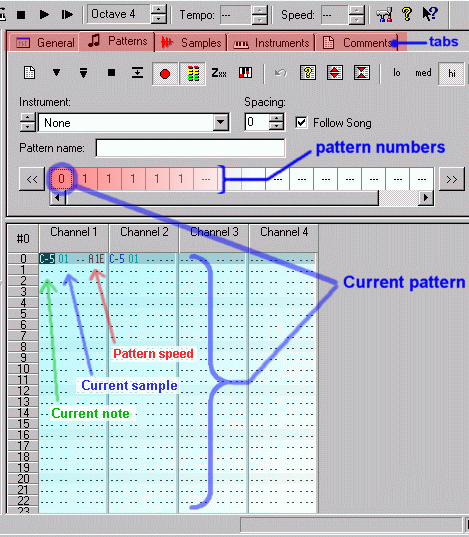 Note the pattern speed.
You need to select all three characters (which can be different at your end) by dragging over them. Right-click the selection and copy it. Next, you need to switch to the next pattern. You do this, by clicking on the "1" in the pattern numbers section.
Now, place your cursor on the same position where the pattern speed was located in the previous pattern, right-click and paste. If done right, you'll see that the pattern speed has been pasted in the current pattern. Now, all the patterns with the same number (1) have the pattern speed assigned to them.
And when the Unreal Engine reads the umx file, it'll maintain that speed for pattern 1. It will continue playing the note (song) that was played in the first pattern (0).
That basically should solve the whole problem that you get when playing the umx! =)
Note the pattern speed.
You need to select all three characters (which can be different at your end) by dragging over them. Right-click the selection and copy it. Next, you need to switch to the next pattern. You do this, by clicking on the "1" in the pattern numbers section.
Now, place your cursor on the same position where the pattern speed was located in the previous pattern, right-click and paste. If done right, you'll see that the pattern speed has been pasted in the current pattern. Now, all the patterns with the same number (1) have the pattern speed assigned to them.
And when the Unreal Engine reads the umx file, it'll maintain that speed for pattern 1. It will continue playing the note (song) that was played in the first pattern (0).
That basically should solve the whole problem that you get when playing the umx! =)
Now you can save the whole bunch as a module and safely import it into UEd and convert it into a music file.
If you come to find that the volume of your mod is too low, then I know of two ways to increase the volume:
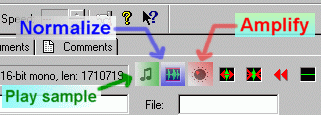 One way is by switching to the samples tab and adjusting the sample's volume with the normalize and amplify buttons. This will change the volume of the sample that you imported into MPT. If you would change the sample volume and save the module, there's no way of un-doing the operation.
You would have to re-import the wave file into MPT (by clicking the "open" button in the samples tab). You can click the play button to play the sample to hear whether you need to adjust the sample again.
One way is by switching to the samples tab and adjusting the sample's volume with the normalize and amplify buttons. This will change the volume of the sample that you imported into MPT. If you would change the sample volume and save the module, there's no way of un-doing the operation.
You would have to re-import the wave file into MPT (by clicking the "open" button in the samples tab). You can click the play button to play the sample to hear whether you need to adjust the sample again.
- Another way of doing this is by first selecting the current note (C-5) and the current sample (01). You copy this and paste it in the next column/channel in the same row number (number 0). If you do this for the 4th channel, the volume will be doubled (increase by 3 dB). I find this way easier and more efficient. You don't have to change the sample itself by doing this and you can come back later and add or delete some channels.
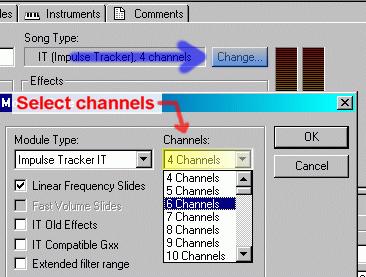 If you still need to increase the volume, you need to add more channels. You can do this by switching to the "General" tab and clicking the "change" button (see screenshot). In the screen that appears, you can specify the number of channels you want.
So if you want two more channels, you select a total of 6 channels from the list, switch back to the patterns tab and copy & paste the note + sample code to the two channels. Save the module and you're all done! :)
If you still need to increase the volume, you need to add more channels. You can do this by switching to the "General" tab and clicking the "change" button (see screenshot). In the screen that appears, you can specify the number of channels you want.
So if you want two more channels, you select a total of 6 channels from the list, switch back to the patterns tab and copy & paste the note + sample code to the two channels. Save the module and you're all done! :)
- Additional info: to import the mod into UEd, first start up UEd (located in your UnrealTournament\System folder, filename: UnrealEd.exe).
Open the music browser, go to file > import and choose the module. Open it, confirm the name and it will appear in the music browser. Click on the play button on the music browser to test whether the module turned out well.
Don't forget to save the module as a umx file! You do this by clicking the "save" button in the same music browser. You'd have to specify a name for the umx. Good luck! ;)
One final note: when you want to distribute the umx or mod, remember to give credits in a txt file to whoever made the song in the first place. There's no need to include the wave file itself in the package (zip file), because this is already imported into the module.
That's it for this tute! :)
Any problems, questions, suggestions or comments? You can Email me!
Links
Finally, here are some links to Unreal / UT mapping related forums:
Infogrames Unreal / UT Editing Forum
T.com Mapping Forum
All rights reserved
