Preparing a Character for use with the
Unreal Skeletal Animation System

LEASE NOTE: this document is obsolete. Please consult the Unreal Developer Network site for the latest documentation including detailed tutorials and plugins.


Overview

Skeletal animation gives your characters smoother movement than was possible with vertex animation, but they must be designed and prepared properly to get the desired results. Generally, polygon counts can increase, because memory usage does not balloon as it does with vertex animations, and rendering power becomes the new bottleneck. The difficult part is that the artists no longer have frame by frame, vertex by vertex control of their animations. Each vertex can only be animated by the 
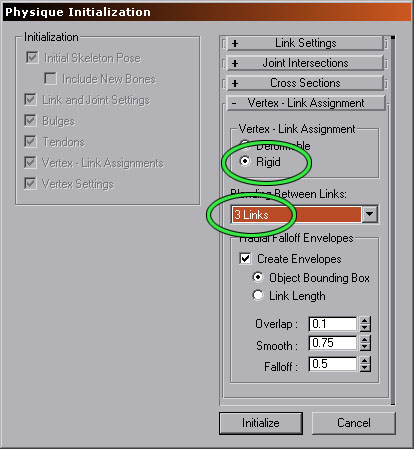
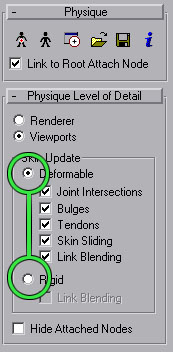
bones around it, with fewer being better. It is recommended that each vertex has 3 or fewer influences, but more can be used if really needed. No bulges, tendons, or other special Physique tools may be used. This is necessary so that meshes will deform in Max exactly as they will in the game engine.


Optimizing your Mesh

Any mesh can benefit from being tweaked for use in game, no matter how good it looks in Max. The Unreal Engine uses vertex lighting for meshes, which means that light and dark areas are applied at actual vertices, with areas in between calculated as an average. Therefore, the more vertices there are the smoother the lighting will appear. If you have the polygons to spare, make sure you have a minimum number of 'long' edges. Even on a robotic character, a thigh section that stretches from the hip to the knee will look better if there are a few segments in it.

Skeletal animation is not as kind as most would like on areas such as shoulders and elbows. This is because the influences of the bones on the vertices are linear, not spline-based like Physique's Deformable mode. A shoulder lifted straight above the head is prone to pinching, unless designed particularly well. A workaround is to segment the arms from the body if appropriate, as in the case of robots, knights in armor, or even characters in vests or clearly segmented clothing. Another possible solution is to add an extra 'helper' bone to your skeleton that can be animated to make the skin shift more naturally. This could be driven by an expression if someone is feeling really clever, since animating this by hand would be an arduous task.

Neck areas are also sometimes tricky. A neck segmented many times looks smooth, lights perfectly, but can deform horribly. Pay special attention to how the neck deforms when the character looks to extreme angles, since this area will probably draw a lot of attention in game.

It is extremely important that you weld the vertices on your mesh. This is because meshes are drawn smoothly as long as faces share vertices, with abrubt shadows usually showing up along edges where this has not been done. The LOD code will also 'tear' the model apart at these seams. So unless you have a specific reason for doing so, make sure you weld your vertices. I have to stress this because Max has the annoying behavior of unwelding vertices on .3ds files you import.


Designing a Skeleton

Your character's skeleton needs to be designed efficiently to take full advantage of the benefits of skeletal animation. Each bone requires resources to track and animate, so eliminating redundant or clumsy hierarchies is important. For example, if your characters are only going to have 2 digits on their hand (a thumb and four bonded fingers) it is an incredible waste to have a Biped with 5 fingers with 3 joints each. Evaluate the exact function of each bone and make sure you need it before finalizing your skeleton.


Initializing Physique

When linking a mesh to a biped (or any hierarchy for that matter) you must initialize with Rigid Vertex Link Assignments. If you do not, what you see in Max will be different from what you see in the engine. This is because Max's Deformable mode computes vertex deformation in a special way which is not duplicated in the engine. The image to the right shows the correct initialization settings, along with the recommended 3 link maximum.

All of the other settings can be left as their default, or set to whatever you normally would use. Editing vertex weights may be done by adjusting envelopes or by assigning vertices manually (or even typing in values).

When exported, all weights are normalized so they add up to 100% influence automatically.


Often people report differences between what they see in Max and what they see in the engine. Usually this indicates a problem with the initial setup. An easy way to see if a model is set up wrong is to toggle between the Physique Level of Detail settings while the model is in a non-reference pose. If the mesh surface 'shifts' in any way, it has been linked up incorrectly. To the left you can see an image of the radio buttons to toggle between to check a model.

Physique is also sometimes slow if many different pieces of your mesh are individually Physiqued. It is usually best to combine segmented parts that are not overlapping into a single object before applying Physique. This is not a limitation of the Unreal Engine as it consolidates everything into a single mesh upon export.

For example, you could combine both hands and feet into a single object. They are usually far enough away from each other that you can still easily edit them without having trouble identifying individual vertices that need attention. You could even combine all parts of your mesh into a single object, but this is sometimes confusing and makes working with intricate overlapping areas difficult. Experiment with linkups and find one that works best for you.


Other Issues

There are some other things to watch for when preparing your models due to quirks in Physique. Some of the things are well known to Max users while others may be new, since a lot of things can be 'wrong' with a Physique setup that will not affect cinematic or vertex animation, but will give skeletal animation some problems.

Creating a Skeleton Without Biped - This is completely possible, as long as you add the appropriate Dummy objects to the ends of your hierarchies. The exporter will work on any valid hierarchy with a single root.

Adding Bones to Biped - A lot of artists need to add extra bones for things such as special shoulder pads, wings, or even weapon attach points. This is done in the standard method, making sure a Dummy is linked to the end of any new bone chain, even if there is only a single bone added. This should be done before applying Physique to the mesh. If the Dummy objects are not present, Physique will ignore them as links. Biped bones work because the Dummys are automatically created for you.

Link Rigid Meshes After Physiquing - If you have rigid meshes that do not deform at all (helmets, shoulder pads, etc.) you can link them to your skeleton using Max's standard link command. However, this should be done after you have applied (and initialized) all meshes that will be Physiqued, because otherwise Physique will interpret these meshes as links in the hierarchy. They will probably not deform your mesh unexpectedly, but extra links will be established and may be exported as bones into the engine. This can sometimes create problems, and wastes engine resources if nothing else.

Unlink Meshes after Removing Physique - When I am working, I find myself applying and removing Physique several times when setting up a character. If you let Physique link your mesh to the root (default behavior) deleting the Physique modifier will not unlink your mesh. If you then proceed to apply Physique again, it will treat the mesh you are trying to Physique as a bone and add an extra link to that mesh's origin. This can cause some of the problems listed in the previous section. To avoid this, always 'unlink' meshes after you remove the Physique modifier (or collapse the stack).


[end of document | back to top]

Copyright Epic Games 2000

James Green | jgreen@epicgames.com
Erik de Neve | erik@epicgames.com