Welcome to the
Tutorial N° 2 - Light, Water & Sky
Part two of the level editing tutorial for UnrealEd. After having built our
1st room in part 1, we will now change some details.
First we will learn how to change some of the Light
charateristics like color, intensity, type, ... Then we will
add some Water to our test map... and finally a nice
Sky with moons...
Note that Semmel developed
the "Light" section of this tutorial, and he described the "Water" and
"Sky" sections.
... Details, the details, ohh those blasted details ...
Page start: Saturday, August 15th 21:10 1998
Last updated on Wednesday, September 16th 21:56 1998
Tutorial N° 2
...Forword
...Let there be Light ... Color, Intensity, ...
...Water ... Splish Splash ;)
...May the Skys come alight !
Forword
About colored light. Before you go about editing your light sources in the next section. Please
take the time to read the following notes:
Especially because it's rather easy to use colored light, don't abuse it !...
it can be very annoying to have violent red, freezing blue, or jucky green lights all about.
Always be aware that colors set the mood of a map... so try to cut down on too much colored
light. For a few effects it's ok... You might like to use orange
light in your map... and the outside parts of your map, it gives the maps a nice dawn or
sunset ambience.
Appart from coloring, you can also select among many light types...
for the most part I can only say... hands off! ;)... Strobes and Disco sorts of light are
very darn annoying...
And please remember so save your work, regularily... I did some
testing today and while adding all sorts of decoration (actors), UnrealEd messed up the map
and since I only had *1* version of the map I had to start afresh... so be warned !!!...
I also noted that UnrealEd likes to crash on mouse double clicks :(... *curses*...
Setting
Light
Properties
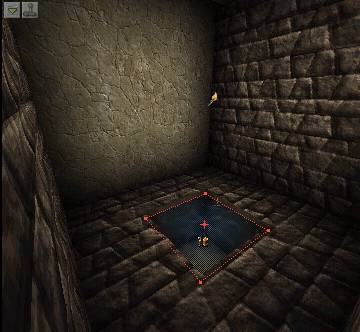
The light in the previous tutotial is a bit boring, so let's
change the "light source" in that map
(t1.zip, 1.97 KB). To be able to change the properties of
our light source , we will need to select the torch in one of
the 4 views, it will turn green.
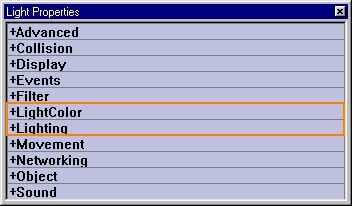
There are several ways to change the properties of any actor. Press
the "F4" key or press the
right mouse button and select
"Light Properties (1 selected... )", or left double click
on the torch (be careful with the latter, double clicks tend to make UnrealEd crash!).
The menu on the right hand side will appear, the enties that are of interest to use
are marked.
To change the light properties, you only have to change the points
"Light Color" and "Lighting".
Click on these 2 entries to be able to edit them, you will see several new entries
like in the menu shot below.
- Light Color
You can set the Brightness
(values from 0 to 255 possible, 64 is the default), the
Hue (coloring, default 0 is white),
and Saturation (default 255, will bleach
out any color to white, try lower values to see colors set with Hue).
Play around with the values, and notice how the light changes in the 3D view.
For our example try the values 64, 170, 0,
this will color the room in dark blue. The
color update should be seen right away, if not hit "F8"
to rebuild the map.
- Lightning
Now for the really "evil" stuff ;)... I'm picking out some of the points that sound
interesting...
Actor Shadows: Will give any "actor", be it a weapon, ammu,
monsters etc. a shadow... this will look cool, but will make your map laggy, so cool it
with this option ;)...
Corona...
Lense Flare...
Light Radius: Determine the size of the light source...
Light Type ... None, Steady, Pulse, Blink, Flicker,
Strobe, Backdrop Light, Subtle Pulse, Texture Palette Once, Texture Palette Loop...
many effects you might like to try... stick with Steady in most cases
though...
Volume Fog: Turn on fog...
Volume Radius: Set this to something bigger than 0
to determine the extent of the fog.
(Sorry just tested the above effects... hmmm fog, flare etc. don't seem to work...
I am still testing it... :(...)
It might be a good idea to load some of Unreal's single player maps, and see how
professionals did the job... The 3D view will look something like this:
Water ...
Splish
Splash =)
So after manipulating our light source we will add a small
pool in our map.
Pick , Scale & Place it with
or
, and Subtract it
.
First we will carve out a "square" hole
in the floor of the map, using a cube.
.
Place it in the middle of the room, and let 80% of the
cube look "out" of the main rooms floor. After placing the brush you should see this
in your top and front 2D views.
.
Before substracting our pool you might like to pick a different texture than we used for the walls.
Select this texture and then hit Subtract Brush. There should be a hole
in the floor now, with the new texture lining the walls.
Add Sheet ,
Scale & Place it with ,
Pick Water Texture,
Special Brush "Water" plane .
We now want to "fill" the hole in our map's floor with water. First we need to close
.
the hole with a "Sheet", place the sheet
over the hole and scale it until it completely covers it in
the top 2D view. In the "side" (front or left) views, place the sheet a bit below
the main rooms foor, see the shot on the right for this.
So since be will be using the sheet as a water
surface, you might like to to pick a water texture. For this Load (Button in UnrealEd on bottom left) a new texture
set called GenFluid.utx, pick one water
texture, by left-clicking on it.
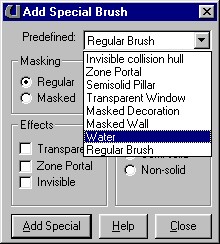
The sheet is supposed to be something special ;)... so click on the
"Add Special Brush" icon in the toolbar. You will be presented
with the menu on the right.
Pick as "Predefinded:" menu point Water!
Then click on "Add Special" to aply the setting and then hit "Close".
At this point it's a good idea the start the rebuilder with the
F8 key. As you will notice in the 3D view, our pool looks
finished.
But there is still one thing left to do. We need to tell Unreal that our hole is supposed to be
filled with water. For this we have to select "Classes" in the browser
on the right hand side of UnrealEd, and there we click on "Info"
and then on "Zone Info".
Finally click on "Water Zone" (see the browser shot on the left)...
Now go into the 2D top view and right mouse click over the pool,
a menu will appear that lets you "Add Info here", select it and
the info icon (on right) will appear in all views. Place this
icon somewhere *in* our pool. With this icon we have definded where water will be
placed in Unreal, filling the hole up to the water surface.
After all this clicking around you should (hopefully ;) see something like
this:
Sky ... Animated!
We have a room, light, a pool, and now we are ready for some cool
sky.

 There are several ways to change the properties of any actor. Press
the "F4" key or press the
right mouse button and select
"Light Properties (1 selected... )", or left double click
on the torch (be careful with the latter, double clicks tend to make UnrealEd crash!).
The menu on the right hand side will appear, the enties that are of interest to use
are marked.
There are several ways to change the properties of any actor. Press
the "F4" key or press the
right mouse button and select
"Light Properties (1 selected... )", or left double click
on the torch (be careful with the latter, double clicks tend to make UnrealEd crash!).
The menu on the right hand side will appear, the enties that are of interest to use
are marked. - Light Color
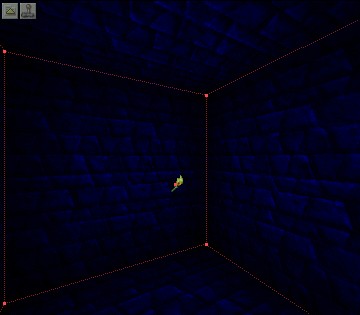
 The sheet is supposed to be something special ;)... so click on the
"Add Special Brush" icon in the toolbar. You will be presented
with the menu on the right.
The sheet is supposed to be something special ;)... so click on the
"Add Special Brush" icon in the toolbar. You will be presented
with the menu on the right.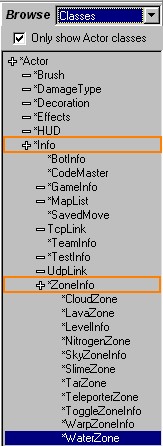 But there is still one thing left to do. We need to tell Unreal that our hole is supposed to be
filled with water. For this we have to select "Classes" in the browser
on the right hand side of UnrealEd, and there we click on "Info"
and then on "Zone Info".
Finally click on "Water Zone" (see the browser shot on the left)...
But there is still one thing left to do. We need to tell Unreal that our hole is supposed to be
filled with water. For this we have to select "Classes" in the browser
on the right hand side of UnrealEd, and there we click on "Info"
and then on "Zone Info".
Finally click on "Water Zone" (see the browser shot on the left)...