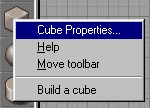
 We want to make the cube a bit bigger, for this we Right-Mouse-Click
on the "Build A Cube" icon above. You should see something like the shot on the right:
We want to make the cube a bit bigger, for this we Right-Mouse-Click
on the "Build A Cube" icon above. You should see something like the shot on the right:
|
Welcome to the
Tutorial N° 1 - 1st Room This is the first level editing tutorial for UnrealEd. We will build a simple room with player start, and a light, we will also learn how to apply textures. There are many other tips that will help you to get started. Note that Semmel developed this tutorial. I only translated it into english, did my own screen shots, added some comments, and redesigned the original pages ;). ... Now rive up UnrealEd ...
Page start: Friday, August 14th 19:27 1998 |
|
Getting Started
As with any tutorials it is recommended to have UnrealEd running so that you can try out parts of the tutorial as they enfold. At this point, play around with the navigation in the 2D & 3D views.
Building our 1st Room
We want to make the cube a bit bigger, for this we Right-Mouse-Click
on the "Build A Cube" icon above. You should see something like the shot on the right:
Highlight "Cube Properties" and set the desired size. For this test we choose the size 256 x 256 x 256. Notice how all 4 views are updated if you happen to change the Height, Width, or Breadth. Now click on "Build" and then on "Close". You just sucessfully changed the cube's size :).
![]() ,
,
![]() Of course this is a rather complicated and slow way to change the cube's size.
You might like to try the "Scale Brush" icon
(to size up the whole cube) or the "Stretch Brush" icon
(to change the cube in only one direction). To do this:
Hold down the qualifier key CTRL *and* the
left mouse button and move the mouse to change the cube's size.
(Try experimenting with these a bit and with the different views).
Of course this is a rather complicated and slow way to change the cube's size.
You might like to try the "Scale Brush" icon
(to size up the whole cube) or the "Stretch Brush" icon
(to change the cube in only one direction). To do this:
Hold down the qualifier key CTRL *and* the
left mouse button and move the mouse to change the cube's size.
(Try experimenting with these a bit and with the different views).
After this little excursion, we need to chose a Texture
for our room For this notice the "bar" on the
top right hand side of UnrealEd, where you can select these textures:

|
|
![]() After having picked a nice wall texture, you will have to click on the
"Substract Brush from World" icon (on the right)
to "place" the cube in the Unreal "world". The red wire grid cube should
now be a textured square room (see the 3D view). Welcome to your first simple
Unreal room :))
After having picked a nice wall texture, you will have to click on the
"Substract Brush from World" icon (on the right)
to "place" the cube in the Unreal "world". The red wire grid cube should
now be a textured square room (see the 3D view). Welcome to your first simple
Unreal room :))
 We still have to tell UnrealEd where to place players. We need a socalled
PlayerStart. You will find this entity under
"Classes".
We still have to tell UnrealEd where to place players. We need a socalled
PlayerStart. You will find this entity under
"Classes".
In the menu pick Classes, the textures will disappear and a list of classes will appear like: Brush, Damage Type, Decoration, Effects, HUD, Info, Inventory, Keypoint, Light, Menu, Navigation Point, Pawn, Projectile, Score Board, Triggers... To set the player spawn point look under "NavigationPoint / Playerstart".
 Next go to the 3D view and move where you want to "start". Place the mousepointer
somewhere near the floor and then press the right
mouse button. You should see something like the shot on the right.
Next go to the 3D view and move where you want to "start". Place the mousepointer
somewhere near the floor and then press the right
mouse button. You should see something like the shot on the right.
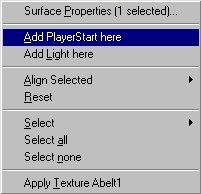
![]() Pick the menu point "Add PlayerStart here" and you should
see a joystick icon in all 4 views...
Pick the menu point "Add PlayerStart here" and you should
see a joystick icon in all 4 views...
So now we can play in our test room.
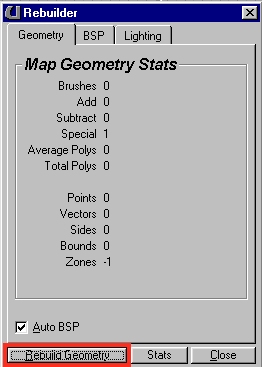
From time to time it's a good idea to recalculate the levels geometrie. You need to do this since UnrealEd is *beta* and has trouble updating the 4 views from time to time. To fix these display update problems hit the F8-key and click on "Rebuild Geometry" from time to time. This will open the window on the right.
Finally we want to add a light source in the middle of the map.
![]() For this we move the mouse pointer back to the floor in the 3D view and press the
right mouse button. The same menu we used to
"Add PlayerStart here" will reappear, only this time select
"Add Light here" and a torch icon
will appear in all views.
Since the torch will probably not be where you want it, you will need to to move it to
the desired place in the 2D views. Zoom close to the torch,
to let you see it more clearly (to do this, hold *both* mouse buttons and move the mouse
in the 2D views). To move the torch around, hold the
qualifiert key shift, press the left
mouse button (over the torch, that will turn green) and move the mouse. Notice how the
torch moves in the other views.
For this we move the mouse pointer back to the floor in the 3D view and press the
right mouse button. The same menu we used to
"Add PlayerStart here" will reappear, only this time select
"Add Light here" and a torch icon
will appear in all views.
Since the torch will probably not be where you want it, you will need to to move it to
the desired place in the 2D views. Zoom close to the torch,
to let you see it more clearly (to do this, hold *both* mouse buttons and move the mouse
in the 2D views). To move the torch around, hold the
qualifiert key shift, press the left
mouse button (over the torch, that will turn green) and move the mouse. Notice how the
torch moves in the other views.
You should see the following on your screen:
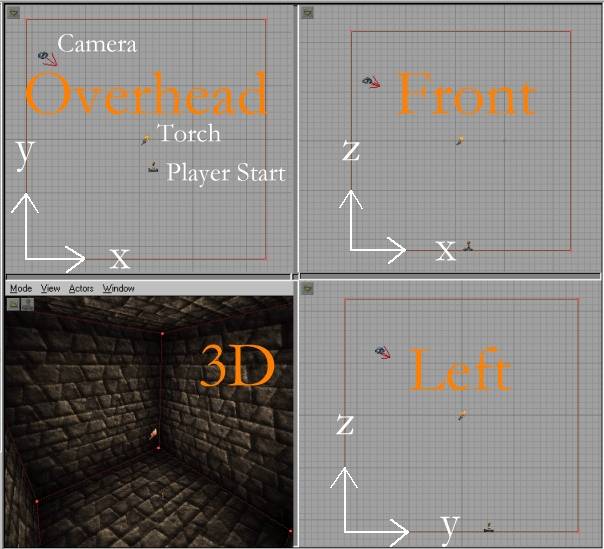
Hit F8-key again to make UnrealEd calculate the lighting into the map. You should then see something like the screenshot above (3D view).
That's sorta it :)... you can play the level right away with Control + P. This will startup Unreal and autoload your map.
If you want to check on the map I put together here is a copy t1.zip (1.97 KB)... unpack this map into your \Unreal\Maps\ directory, run Unreal, open the console, and type: open t1 to play the map.
Final Remarks
This ensures that you will only lose the work of 10 minutes or so, instead of an hours or more. The history of saves will let you fall back on an older version, if you happen to have messed up your current version somehow.
Next Tutorial